Uncategorised files
Jump to navigation
Jump to search
Showing below up to 250 results in range #1 to #250.
View (previous 250 | next 250) (20 | 50 | 100 | 250 | 500)
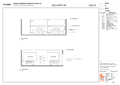
 01.png 1,191 × 842; 17 KB
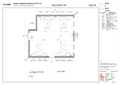
 02.png 1,191 × 842; 131 KB
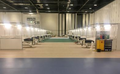
 03.png 1,191 × 843; 178 KB
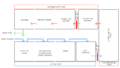
 04.png 1,143 × 790; 1.05 MB
 05.png 1,192 × 843; 662 KB
 06.png 1,192 × 843; 703 KB
 07.png 1,191 × 842; 1.45 MB
 08.png 1,281 × 853; 51 KB
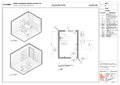
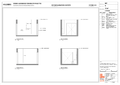
 1 Bed Unit - Elevation.png 1,587 × 1,123; 230 KB
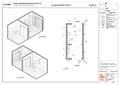
 1 Bed Unit - Plan 3D view.png 1,587 × 1,123; 409 KB
 2 Bed Unit - 3D View.png 1,587 × 1,123; 460 KB
 2 Bed Unit - Elevation 1.png 1,587 × 1,123; 208 KB
 2 Bed Unit - Elevation 2.png 1,587 × 1,123; 189 KB
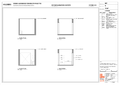
 2 Bed Unit - Plan View.png 1,587 × 1,123; 218 KB
 4 Bed Unit - 3D View 1.png 1,587 × 1,123; 454 KB
 4 Bed Unit - 3D View 2.png 1,587 × 1,123; 459 KB
 4 Bed Unit - Elevation 1.png 1,587 × 1,123; 221 KB
 4 Bed Unit - Elevation 2.png 1,587 × 1,123; 218 KB
 4 Bed Unit - Plan View.png 1,587 × 1,123; 249 KB
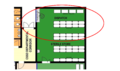
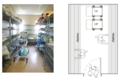
 ACS Cohort beds.png 391 × 242; 194 KB
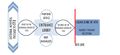
 ACS HCW Flow.png 1,197 × 676; 30 KB
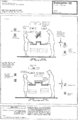
 AK Procedure Room - Elevation.png 3,309 × 2,339; 305 KB
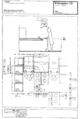
 AK Procedure Room - Plan.png 3,309 × 2,339; 396 KB
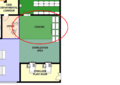
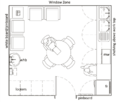
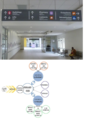
 A generic layout to illustrate room layouts.png 1,341 × 777; 776 KB
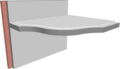
 Access panel.jpg 315 × 283; 16 KB
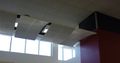
 Acoustic ceiling tiles in suspended grid.png 383 × 286; 215 KB
 Acoustics diag 1.jpg 541 × 404; 43 KB
 Acoustics diag 2.jpg 491 × 367; 21 KB
 Actual Soffit of structure overhead.png 298 × 171; 29 KB
 Admission Counter (Elevation).png 1,587 × 1,123; 243 KB
 Admission Counter (Plan 3D View).png 1,587 × 1,123; 541 KB
 Adult Bathroom (Elevation).png 1,587 × 1,123; 170 KB
 Adult Bathroom (Plan 3D View).png 1,587 × 1,123; 289 KB
 Adult Bedroom (Elevation).png 1,587 × 1,123; 147 KB
 Adult Bedroom (Plan 3D View).png 1,587 × 1,123; 286 KB
 Adult Kitchen (Elevation).png 1,587 × 1,123; 182 KB
 Adult Kitchen (Plan 3D View).png 1,587 × 1,123; 355 KB
 Aesthetics diag.jpg 733 × 385; 27 KB
 Air flow through the zones.png 1,299 × 754; 706 KB
 Airborne infection protective isolation.png 863 × 310; 18 KB
 An example of a small CSSD facility.png 1,045 × 628; 160 KB
 An illustration of local exhaust ventilation device .png 353 × 302; 35 KB
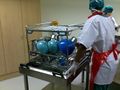
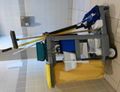
 Anaesthetist trolley in theatre.png 829 × 621; 968 KB
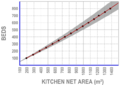 Area guide (Graph).png 622 × 438; 74 KB
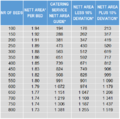 Area guide (table).png 473 × 471; 23 KB
 Areas related to the clean zone.jpg 1,254 × 778; 119 KB
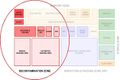 Areas related to the decontamination zone.jpg 1,252 × 830; 120 KB
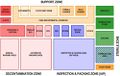
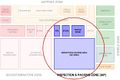 Areas related to the inspection and packing zone.jpg 1,248 × 835; 135 KB
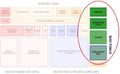
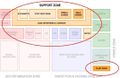 Areas related to the support zone.jpg 1,067 × 696; 103 KB
 Autoclave trolley ready for loading (Tygerberg hospital).png 314 × 236; 175 KB
 Automated cleaning.jpg 686 × 512; 66 KB
 Automated cleaning (Tygerberg Hospital).png 714 × 312; 524 KB
 Automated cleaning area.png 1,915 × 1,687; 1.93 MB
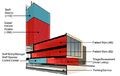
 Axonometric diagram of how the containers would be laid out.png 1,190 × 674; 492 KB
 Aye-aye2.jpg 638 × 406; 46 KB
 BARAGWANATH hospital main kitchen layout.png 1,796 × 749; 189 KB
 BSA logo.png 205 × 83; 13 KB
 Baby Change Room (Plan 3D View Elevation).png 1,587 × 1,123; 213 KB
 Bed Isolator -Vietnam.png 386 × 265; 261 KB
 Bed Unit En-Suite (Elevation).png 1,587 × 1,123; 205 KB
 Bed Unit En-Suite (Plan 3D View).png 1,587 × 1,123; 428 KB
 Bertha Gxoba hospital cateing service unit.png 1,898 × 1,009; 229 KB
 Boardroom Executive (3D View 1).png 1,587 × 1,123; 349 KB
 Boardroom Executive (Elevation).png 1,587 × 1,123; 221 KB
 Boardroom Executive (Plan).png 1,587 × 1,123; 237 KB
 Body Room (Elevation).png 1,587 × 1,123; 201 KB
 Body Room (Plan 3D View).png 1,587 × 1,123; 386 KB
 Boiling pan.png 1,318 × 1,980; 218 KB
 Breast Feeding Mothers Room (Elevation).png 1,587 × 1,123; 207 KB
 Breast Feeding Mothers Room (Plan 3D View).png 1,587 × 1,123; 268 KB
 Brickwork sputum booth-layout and detail.png 1,236 × 906; 216 KB
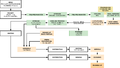
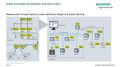
 CMMS planning & implementation process.png 1,083 × 829; 51 KB
 COVID-19 ACS - protective isolation – bed layout.png 1,436 × 802; 133 KB
 COVID-19 ACS – mild-moderate patient bed layout.png 1,440 × 797; 118 KB
 COVID-19 ACS – mild-moderate patient shared ward layout.png 1,447 × 1,052; 341 KB
 COVID-19 ACS – severe-critical patient shared ward layout.png 1,452 × 919; 289 KB
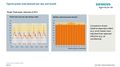
 COVID-19 Resource allocation.png 986 × 531; 129 KB
 COVID-19 Workflow in large unit.png 604 × 442; 154 KB
 COVID-19 Workflow in small unit.png 604 × 433; 151 KB
 COVID Ratios of Service.png 1,049 × 167; 30 KB
 CSIR generic model illustrating functional separation.png 567 × 418; 156 KB
 CSIR generic model illustrating the functional separation.png 616 × 459; 175 KB
 CSIR logo.jpg 120 × 61; 1 KB
 Capital outlay costs vs life span costs.png 477 × 671; 147 KB
 Case study A and B.jpg 2,110 × 1,476; 363 KB
 Case study C and BCH proposal.jpg 2,110 × 1,476; 254 KB
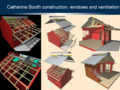 Catherine Booth construction, windows and ventilation.png 3,000 × 2,250; 7.79 MB
 Ceiling.png 391 × 156; 41 KB
 Cementitious board – nail-up ceilings diag.png 414 × 260; 186 KB
 Centralised management of MDR TB.jpg 940 × 737; 111 KB
 ChainOfinfection.jpg 1,417 × 1,231; 74 KB
 Chain of infection.png 1,165 × 800; 85 KB
 Change Cubicle Patient ( Plan Elevation).png 1,587 × 1,123; 224 KB
 Change Cubicle Wheelchair Accessible (Plan 3D View Elevation).png 1,587 × 1,123; 240 KB
 Change Room Staff (Elevation).png 1,587 × 1,123; 253 KB
 Change Room Staff (Plan 3D View).png 1,587 × 1,123; 462 KB
 Change Room Staff Theatre (3D View 1).png 1,587 × 1,123; 428 KB
 Change Room Staff Theatre (3D View 2).png 1,587 × 1,123; 468 KB
 Change Room Staff Theatre (Elevation 1).png 1,587 × 1,123; 220 KB
 Change Room Staff Theatre (Elevation 2).png 1,587 × 1,123; 249 KB
 Change Room Staff Theatre (Plan).png 1,587 × 1,123; 290 KB
 Clean Utility (Elevation).png 1,587 × 1,123; 197 KB
 Clean Utility (Plan 3D View).png 1,587 × 1,123; 326 KB
 Cleaners Room (Elevation).png 1,587 × 1,123; 214 KB
 Cleaners Room (Plan 3D View).png 1,587 × 1,123; 310 KB
 Cleaning-guidelines-for-workplaces-11-June-2020 revised.png 2,100 × 2,970; 13.57 MB
 Cleaning and maintenance diag.jpg 660 × 281; 20 KB
 Cleaning and maintenance diag 2.jpg 570 × 382; 30 KB
 Climate zones of Southern Africa.png 1,378 × 975; 868 KB
 Clinical hand wash basin.png 961 × 511; 46 KB
 Code guide (DoH, 2001, P.20).png 401 × 1,163; 54 KB
 Cold room-general.png 892 × 396; 58 KB
 Cold room - dairy products.png 744 × 761; 103 KB
 Cold room - meat.png 834 × 385; 62 KB
 Cold roomv - fresh vegetables & fruits.png 847 × 370; 62 KB
 Combination trolley.png 1,291 × 1,977; 174 KB
 Combination trolley 2.png 1,285 × 1,928; 159 KB
 Comparative areas of catering service units.png 1,286 × 1,523; 130 KB
 Condition assessment coding.png 663 × 468; 32 KB
 Configuration of activity spaces.jpg 995 × 627; 102 KB
 Consulting Room (3D View).png 1,587 × 1,123; 412 KB
 Consulting Room (Elevation).png 1,587 × 1,123; 264 KB
 Consulting Room (Plan).png 1,587 × 1,123; 265 KB
 Consulting room example layout.png 704 × 791; 139 KB
 Contagion.png 604 × 348; 39 KB
 Conventional food system.png 930 × 1,291; 109 KB
 Conveyor (1).png 1,321 × 1,992; 243 KB
 Cook-chill food system.png 1,252 × 709; 78 KB
 Cook-freeze food system.png 1,557 × 699; 133 KB
 Cooling area.png 1,877 × 1,323; 1.35 MB
 Coughing generating aerosols.jpg 222 × 186; 10 KB
 Counselling Room (Elevation).png 1,587 × 1,123; 251 KB
 Counselling Room (Plan 3D View).png 1,587 × 1,123; 439 KB
 Covid19 facility.png 672 × 424; 177 KB
 Cumulative total cost of service provision.png 1,382 × 1,084; 114 KB
 Customer Presentation TIP Hospitals 01.jpg 2,001 × 1,125; 347 KB
 Customer Presentation TIP Hospitals 02.jpg 2,001 × 1,125; 234 KB
 Customer Presentation TIP Hospitals 03.jpg 2,001 × 1,125; 238 KB
 Customer Presentation TIP Hospitals 04.jpg 2,001 × 1,125; 246 KB
 Customer Presentation TIP Hospitals 05.jpg 2,001 × 1,125; 252 KB
 Customer Presentation TIP Hospitals 06.jpg 2,001 × 1,125; 234 KB
 Customer Presentation TIP Hospitals 07.jpg 2,001 × 1,125; 267 KB
 Customer Presentation TIP Hospitals 08.jpg 2,001 × 1,125; 278 KB
 Customer Presentation TIP Hospitals 09.jpg 2,001 × 1,125; 204 KB
 Customer Presentation TIP Hospitals 10.jpg 2,001 × 1,125; 178 KB
 Customer Presentation TIP Hospitals 11.jpg 2,001 × 1,125; 187 KB
 Customer Presentation TIP Hospitals 12.jpg 2,001 × 1,125; 225 KB
 Customer Presentation TIP Hospitals 13.jpg 2,001 × 1,125; 238 KB
 Customer Presentation TIP Hospitals 14.jpg 2,001 × 1,125; 234 KB
 Customer Presentation TIP Hospitals 15.jpg 2,001 × 1,125; 224 KB
 Customer Presentation TIP Hospitals 16.jpg 2,001 × 1,125; 205 KB
 Customer Presentation TIP Hospitals 17.jpg 2,001 × 1,125; 238 KB
 Customer Presentation TIP Hospitals 18.jpg 2,001 × 1,125; 258 KB
 Customer Presentation TIP Hospitals 19.jpg 2,001 × 1,125; 220 KB
 Customer Presentation TIP Hospitals 20.jpg 2,001 × 1,125; 234 KB
 Customer Presentation TIP Hospitals 21.jpg 2,001 × 1,125; 235 KB
 Customer Presentation TIP Hospitals 22.jpg 2,001 × 1,125; 314 KB
 Customer Presentation TIP Hospitals 23.jpg 2,001 × 1,125; 179 KB
 Customer Presentation TIP Hospitals 24.jpg 2,001 × 1,125; 246 KB
 Customer Presentation TIP Hospitals 25.jpg 2,001 × 1,125; 234 KB
 Customer Presentation TIP Hospitals 26.jpg 2,001 × 1,125; 265 KB
 Customer Presentation TIP Hospitals 27.jpg 2,001 × 1,125; 207 KB
 Customer Presentation TIP Hospitals 28.jpg 2,001 × 1,125; 227 KB
 Customer Presentation TIP Hospitals 29.jpg 2,001 × 1,125; 234 KB
 Customer Presentation TIP Hospitals 30.jpg 2,001 × 1,125; 193 KB
 Customer Presentation TIP Hospitals 31.jpg 2,001 × 1,125; 222 KB
 Customer Presentation TIP Hospitals 32.jpg 2,001 × 1,125; 158 KB
 Customer Presentation TIP Hospitals 33.jpg 2,001 × 1,125; 149 KB
 Customer Presentation TIP Hospitals 34.jpg 2,001 × 1,125; 234 KB
 Customer Presentation TIP Hospitals 35.jpg 2,001 × 1,125; 145 KB
 Customer Presentation TIP Hospitals 36.jpg 2,001 × 1,125; 150 KB
 Customer Presentation TIP Hospitals 37.jpg 2,001 × 1,125; 234 KB
 Customer Presentation TIP Hospitals 38.jpg 2,001 × 1,125; 265 KB
 Customer Presentation TIP Hospitals 39.jpg 2,001 × 1,125; 246 KB
 Customer Presentation TIP Hospitals 40.jpg 2,001 × 1,125; 285 KB
 Customer Presentation TIP Hospitals 41.jpg 2,001 × 1,125; 249 KB
 Customer Presentation TIP Hospitals 42.jpg 2,001 × 1,125; 232 KB
 Customer Presentation TIP Hospitals 43.jpg 2,001 × 1,125; 262 KB
 DRAWING 1.png 799 × 865; 171 KB
 DRAWING 10.png 688 × 663; 78 KB
 DRAWING 11.png 641 × 693; 126 KB
 DRAWING 12.png 549 × 823; 125 KB
 DRAWING 2.png 1,114 × 804; 191 KB
 DRAWING 3.png 1,116 × 1,198; 244 KB
 DRAWING 4.png 1,459 × 1,536; 373 KB
 DRAWING 5.png 1,343 × 1,536; 364 KB
 DRAWING 6.png 886 × 588; 75 KB
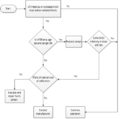 Decision chart for UVGI surface disinfection system monitoring.png 480 × 477; 32 KB
 Decontamination Shower (Elevation 1).png 1,587 × 1,123; 189 KB
 Decontamination Shower (Elevation 2).png 1,587 × 1,123; 185 KB
 Decontamination Shower (Plan 3D View).png 1,587 × 1,123; 406 KB
 Decontamination life cycle.jpg 593 × 614; 60 KB
 Delivery & reception area.png 760 × 754; 93 KB
 Dental Lab (Elevation).png 1,587 × 1,123; 158 KB
 Dental Lab (Plan 3D View).png 1,587 × 1,123; 232 KB
 Dental Surgery (Elevation).png 1,587 × 1,123; 240 KB
 Dental Surgery (Plan 3D View).png 1,587 × 1,123; 409 KB
 Departmental relationships.png 755 × 783; 161 KB
 Departmental relationships and critical adjacencies.jpg 2,327 × 1,966; 269 KB
 Digital imaging in theatre.png 451 × 339; 277 KB
 Directional signage.png 876 × 1,002; 320 KB
 Dirty Theatre Passage.jpg 179 × 237; 11 KB
 Dirty Utility (Elevation).png 1,587 × 1,123; 210 KB
 Dirty Utility (Plan 3D View).png 1,587 × 1,123; 362 KB
 Dishwasher (1).png 1,311 × 1,985; 243 KB
 Dishwasher (2).png 1,277 × 1,968; 206 KB
 Dishwasher (3).png 1,333 × 1,989; 216 KB
 Dispatch desk.png 1,877 × 1,117; 979 KB
 Dispatch points in the decontamination cycle.jpg 686 × 621; 77 KB
 Distribution of risk for medical devices.png 480 × 349; 34 KB
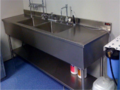 Double-bowl sink unit.png 801 × 600; 1.13 MB
 Drawing 13-1.jpg 400 × 307; 21 KB
 Drawing 13.png 405 × 574; 69 KB
 Drawing 13 1.png 519 × 357; 206 KB
 Drawing 14.png 647 × 383; 58 KB
 Drawing 15.png 358 × 498; 45 KB
 Drawing 16.png 1,108 × 1,536; 351 KB
 Drawing 17.png 769 × 1,087; 214 KB
 Drawing 18.png 533 × 836; 128 KB
 Drawing 19.png 509 × 336; 200 KB
 Drawing 20.png 520 × 457; 51 KB
 Drawing 21.png 374 × 583; 52 KB
 Drawing 22.png 774 × 661; 149 KB
 Drawing 23.png 249 × 647; 39 KB
 Drawing 24.png 683 × 686; 83 KB
 Drawing 25.png 1,011 × 527; 141 KB
 Drawing 26.png 463 × 824; 101 KB
 Drawing 27.png 485 × 705; 72 KB
 Drawing 28.png 1,094 × 914; 246 KB
 Drawing 29.png 810 × 384; 67 KB
 Drawing 7.png 686 × 526; 43 KB
 Drawing 8.png 717 × 528; 31 KB
 Drawing 9.png 458 × 522; 83 KB
 Drip sink with hinged bucket grid.jpg 395 × 534; 27 KB
 Emissions from materias diag 1.jpg 1,100 × 333; 55 KB
 Emissions from materias diag 2.jpg 479 × 289; 17 KB
 Entrance to OTU.jpg 1,383 × 637; 98 KB
 Example of mapping for hub and secondary destination points.png 1,881 × 2,511; 3.02 MB
 Example of modular laboratory.png 938 × 1,250; 55 KB
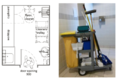
 Example of overnight sleeping area for staff.png 2,523 × 1,757; 609 KB
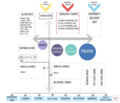 FIGURE 15.png 1,322 × 1,135; 580 KB
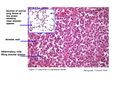 FIGURE 3.2 HISTOLOGY.jpg 1,500 × 1,125; 1.07 MB
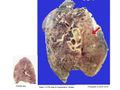 FIGURE 3.3.jpg 1,270 × 950; 754 KB
 Facility classification vs levels of care.png 911 × 529; 72 KB
 Facility design.png 454 × 342; 356 KB
 Facility finishes.png 429 × 310; 302 KB


.png)
.png)
.png)
.png)
.png)
.png)
.png)
.png)


.jpg)


.png)
.png)


.png)

.png)


.png)

.png)
.png)

.png)
.png)
.png)
.png)
.png)

.png)
.png)


.png)
.png)
.png)
.png)
.png)
.png)
.png)
.png)
.png)

.png)
.png)
.png)
.png)


.png)
.png)
.png)


.png)


.png)
.png)


.png)
.png)
.png)


.png)
.png)
.png)
.png)


.png)
.png)
.png)
.png)
.png)


.png)
.png)