Uncategorised files
Jump to navigation
Jump to search
Showing below up to 100 results in range #1 to #100.
View (previous 100 | next 100) (20 | 50 | 100 | 250 | 500)
 01.png 1,191 × 842; 17 KB
 02.png 1,191 × 842; 131 KB
 03.png 1,191 × 843; 178 KB
 04.png 1,143 × 790; 1.05 MB
 05.png 1,192 × 843; 662 KB
 06.png 1,192 × 843; 703 KB
 07.png 1,191 × 842; 1.45 MB
 08.png 1,281 × 853; 51 KB
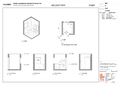
 1 Bed Unit - Elevation.png 1,587 × 1,123; 230 KB
 1 Bed Unit - Plan 3D view.png 1,587 × 1,123; 409 KB
 2 Bed Unit - 3D View.png 1,587 × 1,123; 460 KB
 2 Bed Unit - Elevation 1.png 1,587 × 1,123; 208 KB
 2 Bed Unit - Elevation 2.png 1,587 × 1,123; 189 KB
 2 Bed Unit - Plan View.png 1,587 × 1,123; 218 KB
 4 Bed Unit - 3D View 1.png 1,587 × 1,123; 454 KB
 4 Bed Unit - 3D View 2.png 1,587 × 1,123; 459 KB
 4 Bed Unit - Elevation 1.png 1,587 × 1,123; 221 KB
 4 Bed Unit - Elevation 2.png 1,587 × 1,123; 218 KB
 4 Bed Unit - Plan View.png 1,587 × 1,123; 249 KB
 ACS Cohort beds.png 391 × 242; 194 KB
 ACS HCW Flow.png 1,197 × 676; 30 KB
 AK Procedure Room - Elevation.png 3,309 × 2,339; 305 KB
 AK Procedure Room - Plan.png 3,309 × 2,339; 396 KB
 A generic layout to illustrate room layouts.png 1,341 × 777; 776 KB
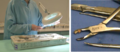
 Access panel.jpg 315 × 283; 16 KB
 Acoustic ceiling tiles in suspended grid.png 383 × 286; 215 KB
 Acoustics diag 1.jpg 541 × 404; 43 KB
 Acoustics diag 2.jpg 491 × 367; 21 KB
 Actual Soffit of structure overhead.png 298 × 171; 29 KB
 Admission Counter (Elevation).png 1,587 × 1,123; 243 KB
 Admission Counter (Plan 3D View).png 1,587 × 1,123; 541 KB
 Adult Bathroom (Elevation).png 1,587 × 1,123; 170 KB
 Adult Bathroom (Plan 3D View).png 1,587 × 1,123; 289 KB
 Adult Bedroom (Elevation).png 1,587 × 1,123; 147 KB
 Adult Bedroom (Plan 3D View).png 1,587 × 1,123; 286 KB
 Adult Kitchen (Elevation).png 1,587 × 1,123; 182 KB
 Adult Kitchen (Plan 3D View).png 1,587 × 1,123; 355 KB
 Aesthetics diag.jpg 733 × 385; 27 KB
 Air flow through the zones.png 1,299 × 754; 706 KB
 Airborne infection protective isolation.png 863 × 310; 18 KB
 An example of a small CSSD facility.png 1,045 × 628; 160 KB
 An illustration of local exhaust ventilation device .png 353 × 302; 35 KB
 Anaesthetist trolley in theatre.png 829 × 621; 968 KB
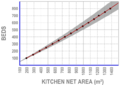 Area guide (Graph).png 622 × 438; 74 KB
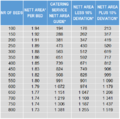 Area guide (table).png 473 × 471; 23 KB
 Areas related to the clean zone.jpg 1,254 × 778; 119 KB
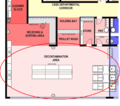
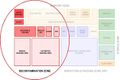 Areas related to the decontamination zone.jpg 1,252 × 830; 120 KB
 Areas related to the inspection and packing zone.jpg 1,248 × 835; 135 KB
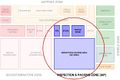
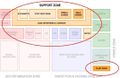 Areas related to the support zone.jpg 1,067 × 696; 103 KB
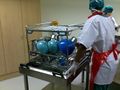
 Autoclave trolley ready for loading (Tygerberg hospital).png 314 × 236; 175 KB
 Automated cleaning.jpg 686 × 512; 66 KB
 Automated cleaning (Tygerberg Hospital).png 714 × 312; 524 KB
 Automated cleaning area.png 1,915 × 1,687; 1.93 MB
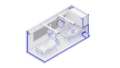 Axonometric diagram of how the containers would be laid out.png 1,190 × 674; 492 KB
 Aye-aye2.jpg 638 × 406; 46 KB
 BARAGWANATH hospital main kitchen layout.png 1,796 × 749; 189 KB
 BSA logo.png 205 × 83; 13 KB
 Baby Change Room (Plan 3D View Elevation).png 1,587 × 1,123; 213 KB
 Bed Isolator -Vietnam.png 386 × 265; 261 KB
 Bed Unit En-Suite (Elevation).png 1,587 × 1,123; 205 KB
 Bed Unit En-Suite (Plan 3D View).png 1,587 × 1,123; 428 KB
 Bertha Gxoba hospital cateing service unit.png 1,898 × 1,009; 229 KB
 Boardroom Executive (3D View 1).png 1,587 × 1,123; 349 KB
 Boardroom Executive (Elevation).png 1,587 × 1,123; 221 KB
 Boardroom Executive (Plan).png 1,587 × 1,123; 237 KB
 Body Room (Elevation).png 1,587 × 1,123; 201 KB
 Body Room (Plan 3D View).png 1,587 × 1,123; 386 KB
 Boiling pan.png 1,318 × 1,980; 218 KB
 Breast Feeding Mothers Room (Elevation).png 1,587 × 1,123; 207 KB
 Breast Feeding Mothers Room (Plan 3D View).png 1,587 × 1,123; 268 KB
 Brickwork sputum booth-layout and detail.png 1,236 × 906; 216 KB
 CMMS planning & implementation process.png 1,083 × 829; 51 KB
 COVID-19 ACS - protective isolation – bed layout.png 1,436 × 802; 133 KB
 COVID-19 ACS – mild-moderate patient bed layout.png 1,440 × 797; 118 KB
 COVID-19 ACS – mild-moderate patient shared ward layout.png 1,447 × 1,052; 341 KB
 COVID-19 ACS – severe-critical patient shared ward layout.png 1,452 × 919; 289 KB
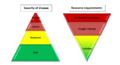 COVID-19 Resource allocation.png 986 × 531; 129 KB
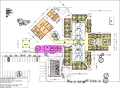
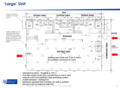 COVID-19 Workflow in large unit.png 604 × 442; 154 KB
 COVID-19 Workflow in small unit.png 604 × 433; 151 KB
 COVID Ratios of Service.png 1,049 × 167; 30 KB
 CSIR generic model illustrating functional separation.png 567 × 418; 156 KB
 CSIR generic model illustrating the functional separation.png 616 × 459; 175 KB
 CSIR logo.jpg 120 × 61; 1 KB
 Capital outlay costs vs life span costs.png 477 × 671; 147 KB
 Case study A and B.jpg 2,110 × 1,476; 363 KB
 Case study C and BCH proposal.jpg 2,110 × 1,476; 254 KB
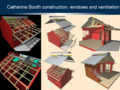 Catherine Booth construction, windows and ventilation.png 3,000 × 2,250; 7.79 MB
 Ceiling.png 391 × 156; 41 KB
 Cementitious board – nail-up ceilings diag.png 414 × 260; 186 KB
 Centralised management of MDR TB.jpg 940 × 737; 111 KB
 ChainOfinfection.jpg 1,417 × 1,231; 74 KB
 Chain of infection.png 1,165 × 800; 85 KB
 Change Cubicle Patient ( Plan Elevation).png 1,587 × 1,123; 224 KB
 Change Cubicle Wheelchair Accessible (Plan 3D View Elevation).png 1,587 × 1,123; 240 KB
 Change Room Staff (Elevation).png 1,587 × 1,123; 253 KB
 Change Room Staff (Plan 3D View).png 1,587 × 1,123; 462 KB
 Change Room Staff Theatre (3D View 1).png 1,587 × 1,123; 428 KB
 Change Room Staff Theatre (3D View 2).png 1,587 × 1,123; 468 KB


.png)
.png)
.png)
.png)
.png)
.png)
.png)
.png)


.jpg)


.png)
.png)


.png)

.png)


.png)

.png)
.png)

.png)
.png)
.png)
.png)
.png)

.png)
.png)


.png)
.png)
.png)
.png)
.png)
.png)